Large Gauge Repair Case Study
This is another great example of what can be done to correct a large gauge earring defect. This case example focuses on a very pleasant young lady from San Diego, CA who desired to have her earlobes reshaped after having them dilated with gauge earrings. Like many other gauge earring patients, she simply got to the point where she wanted to restore the natural earlobe size and contour.
Gauge Earring Clinical Presentation
 Looking at this patient’s left earlobe you can see that she has a rather sizable residual defect from the gauge earrings used. In fact, you can see very clearly that her earlobe has been stretched out quite a distance. Shown in the adjacent photo is an approximate size of the gauge that ultimately creates this size of earlobe defect. Once removed, you can see that the defect created by the gauge results in an earlobe that simply looks as if it is hanging off of the ear. In many cases, the hole in the earlobe will shrink down in size after the gauge has been removed for some time. Unfortunately, it will never close completely on its own and usually will leave a sizable enough defect that necessitates surgical repair of the earlobe.
This type of gauge earring defect is classified as being large in size. In my cosmetic ear surgery practice, I have seen many gauge earring defects that were smaller and others that were even larger in size. This particular patient’s gauge earring defect is shown below in this series that visually demonstrates the wide range of earlobe defects that I encounter regularly in my San Diego practice.

What gauge earring patients need to understand is that not all earlobe defects are repaired in the same manner. Smaller gauge earring defects require certain techniques while larger gauge defects necessitate different methods to be employed. For example, in cases like this large gauge earring defect, much of the stretched earlobe skin is removed in the surgical repair process. In cases of smaller gauge earring defects, the earlobe tissue is simply rearranged without removing much skin.
However, the goal is the same in every gauge earring defect procedure – to restore a more natural looking earlobe.
Large Gauge Earlobe Repair
In this particular case example, the gauge earlobe defect was repaired under local anesthesia. Meaning, the patient did not require anything more than a lidocaine injection in the ear while remaining awake throughout the procedure. Gauge earring patients have the option of undergoing a twilight anesthesia, but this is typically not necessary and is more expensive. Once the ear is numbed, there is really no discomfort with the operation. It is essentially like going to the dentist.
When dealing with a large amount of excess skin from gauge earring use it is necessary to remove the redundant, stretched tissue in the process of re-creating a new earlobe. The trick is to figure out what skin needs to be removed and what remaining skin is going to be used to shape the earlobe.
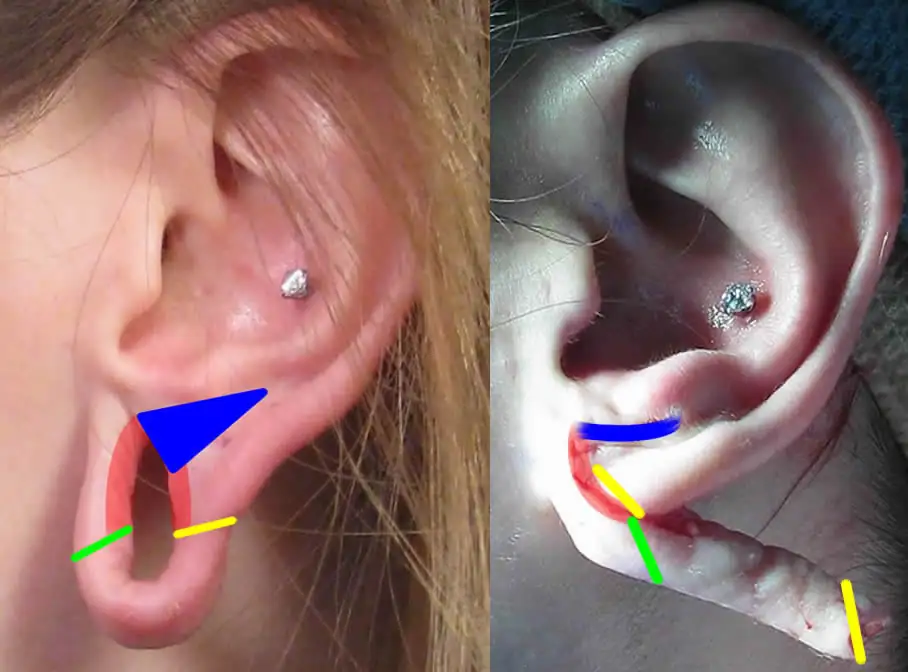
 The adjacent photo diagram outlines one method I like to use to repair large gauge earring defects. I have also included the actual intraoperative photo to help you better understand how the skin was cut and rearranged.
On the left side of the photo you can see the gauge defect with colored markings showing the planned incisions. The red shaded area corresponds to the skin that was removed from the inner lining of the gauge defect. This is required in order to allow the hole to close up properly. The blue triangular shaped area represents a wedge of skin that is removed. The earlobe is then transected (cut across) along the yellow line.
In this process, the cut edges of the red shaded area are brought together as seen on the right side of the adjacent photo. At this point in the operation you can easily see how much excess skin there is from the tissue rearrangement. The green line indicates where additional transection is done to remove most of the excess skin. Additional incremental cuts are then made to remove the residual skin to the point where a natural earlobe contour is achieved. Fine sutures (stitches) are placed under the skin to provide added stability to the earlobe. Even finer sutures are used to bring the edges of the superficial skin layer together.
Gauge Earring Repair Results
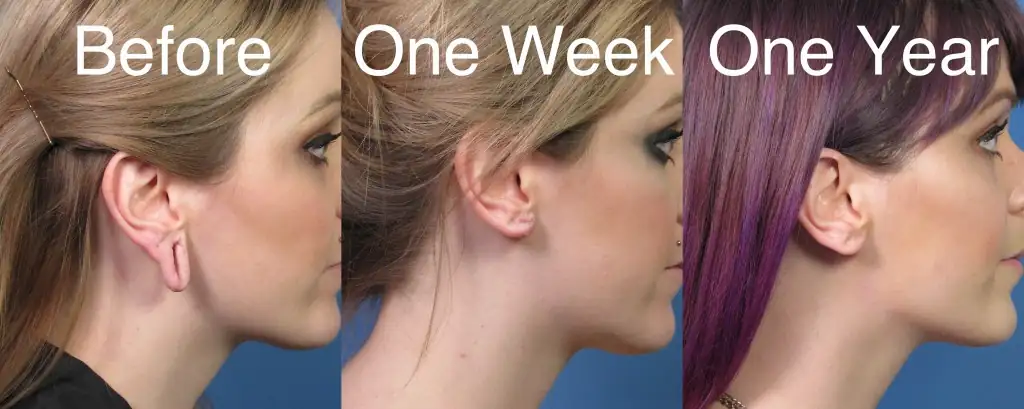
This first photo series below actually includes the appearance of this patient’s ear one week out from gauge earring defect surgery. I included this photo because many gauge earring defect patients ask what their ears will look like in the early recovery period. If you look closely, the one week photo demonstrates residual swelling and fullness along the incision lines. But, overall, her earlobes already look much better in terms of size and shape. And she certainly appears publicly presentable even at one week out from gauge earring defect correction. Her one year photo on the right side below shows a well-healed earlobe that simply looks natural – as if she never had a gauge earring defect.

Final Gauge Earring Repair Results
This patient’s final results at one year out from gauge earring defect repair are shown below. As you can see from the various angles, her earlobes now appear quite natural with very little evidence of her ever having them previously stretched.


